In today’s Side Project Time Hack post, I’m covering how I’ve automated the process of taking new store listing screenshots for my Android apps and showing how much time the automation saves me.
Across everything involved in developing and maintaining a mobile app, I challenge you to find a task more tedious than keeping the store listing screenshots up to date. Screenshots are among the best tools you have to convince potential new users to click ‘Download’ on your apps, so usually you’d want them to be as up to date as possible – letting them showcase the best parts about your app. If your app is relatively new and still going through rapid change, then you might find your existing store listing screenshots becoming obsolete as often as with each update.
This isn’t a problem for apps produced by many big companies because generally they will use Photoshopped mockups as the screenshot asset instead of hand-picked screenshots from a device. Unfortunately I can’t afford to pay anybody to produce Photoshopped mockups or to take all of my app screenshots by hand for me, so I have to do it all myself.
Before I get into all the work I did to automate this process with Python, I want to put into perspective that the number of store listing screenshots for any given app may be far larger than it appears. Take for example my app CryptoConvert Pro on Google Play. Any time you view the store listing, you’re presented with 7 screenshots for different scenarios in the app I want to showcase:

However, that’s only the set of screenshots for one single language. I wanted CryptoConvert to be as inclusive as possible, so I translated the app and my store listing description plus it’s assets into 11 locales resulting in 9 different languages:
![]()
Side note – you can view the translated versions of a store listing by appending a locale as a parameter in the URL directly after the app’s package name. For example, this URL for CryptoConvert Pro which will use your default locale:
https://play.google.com/store/apps/details?id=com.mnm.cryptocurrency.cryptoconvert.pro
If you append “&hl={locale}” to the end of the package name, you can view the translated version. Here is CryptoConvert Pro’s store listing when translated to Hindi:
https://play.google.com/store/apps/details?id=com.mnm.cryptocurrency.cryptoconvert.pro&hl=hi-IN
And here it is in French:
https://play.google.com/store/apps/details?id=com.mnm.cryptocurrency.cryptoconvert.pro&hl=fr-FR
You can use this to view and test your localized assets, and you can send the link to friends / peers who might be able to help you with your translations and give feedback.
Anyways, back to business. Let’s consider that CryptoConvert Pro has 7 screenshots per language, and 9 total languages to support, which results in 63 total unique screenshots that all need to taken by hand. Seems like a lot, right? Well, there is another dimension here which is that the number of screenshots for a project multiplies again depending on how many production “flavors” you support. You may instead know this as “build variant“.
I think the term “flavor” is unique to Android, but the idea exists in other disciplines of software development and it does a pretty good job of explaining itself. When you’re eating a pack of Starbursts, let’s say you pull out a pink flavored Starburst followed by a yellow flavored one. The two candies look a bit different, and functionally they also taste a bit different, but they are still both Starbursts and are made by the same company from the same factory.
With that analogy translated to mobile apps, you can have two or more apps that are mostly the same (and share a lot of the same code) but look and feel just a little bit different. A common use case you’ll see of flavors being used is when an app has both a Free version and a Premium (paid) version.
The Free version might have different colors and branding or might have intermittent advertisements while the Premium version might come with additional features, but they are two unique apps published to the App Store that are built from one single codebase. In my case, CryptoConvert Pro has a free version that you can download instead – CryptoConvert Free.
The screenshots in the Free version of CryptoConvert are all the exact same scenarios as the Pro version, but due to some subtle differences in the UI as well as some expanded features in the Pro version, the screenshots should be considered unique to each flavor.
What was previously 63 unique screenshots is now 63 screenshots x 2 flavors = 126 total screenshots for the whole project.
In other words, any given app may have up to N store listing screenshots, where:
N Screenshots = (# Scenarios) x (# Languages) x (# Flavors)
As we calculated with CryptoConvert:
126 Total Screenshots = 7 scenarios x 9 languages x 2 flavors
That might be more most people expect for a single app project, but I have another app in my portfolio that has the potential to scale even faster.
I use the concept of flavors with my State Lottery Scratch-Off Guide apps too, but instead of being a Free/Pro model, each flavor represents a different State so that people can download the app for the area that they live in.
At the time of writing this, I’ve published 17 different flavors of the Scratch-Off Guide apps:

Each of the State Lottery Scratch-Off Guide apps has 5 screenshot scenarios and their store listing descriptions are only written in English. Using that same formula, we’ll see that the store listings for my Scratch-Off Guide apps currently require:
5 scenarios x 1 language x 17 flavors = 85 screenshot assets
I have plans to eventually expand and translate the store listings for each app to Spanish and French. While I’m at it, I might add another two screenshot scenarios as well. Suddenly I’ll find myself having to maintain:
7 scenarios x 3 languages x 17 flavors = 357 screenshot assets
Combined with the CryptoConvert project, that would be almost 500 screenshots assets that I would need to take and process by hand.
Let’s take a moment to imagine the whole process here:
-
- For each app project:
- For each production flavor:
- For each language it supports:
- For each screenshot scenario:
- Open the app
- Set up the scenario
- Take a screenshot
- Migrate the screenshots for this language off the device and onto my PC before moving onto the next language or flavor
- For each screenshot scenario:
- For each language it supports:
- For each production flavor:
- For each app project:
Once all the screenshots are taken, I have to do roughly the same loop again and:
-
- Import each raw screenshot into my GIMP template for post processing
- Export each finished store listing screenshot asset
- Finally, upload all N screenshots to the App Store Dashboard under each proper locale
*** Note – if you have your apps published on multiple third party app stores such as the Amazon App Store, you can treat that as an additional multiplier to the amount of work it takes to update everything.
Also let’s keep in mind the overhead it takes to install and open each app one by one, change the device locale to update the language, set up all of the different scenarios and make sure that they are consistent across each flavor and language, take the screenshots, move all of the screenshot images off the device, do the post processing in Photoshop / GIMP, export the final screenshots, and finally upload the new assets to the App Stores – and doing all of that without any mistakes.
If you were scrupulous enough to click on CryptoConvert Pro’s Hindi translated store listing link above, you’d see that even at the time of writing and publishing this post, the non-English store listing assets for CryptoConvert Pro are outdated and still use the original generic CryptoConvert branding (although the English assets have been kept relatively up to date). I believe the non-English CryptoConvert Pro assets are dated by at least 10 months at this point – it’s that much of a challenge to update them.
![]()
Hopefully by now it’s clear that the process of updating my app screenshots isn’t something that I can casually grind out on a lazy Sunday afternoon. This is a process that (accounting for my normal schedule) takes many weeks of extremely monotonous and tedious work to complete. That also means it’s a perfect candidate for some good old fashioned automation.
Part 2: App Screenshot Automation – Demo
As per usual with one of my Side Project Time Hack blog posts, I’m going to identify my original requirements for the project and show a quick demo of how it turned out before finally getting into the guts of how it all works.
For this project, the requirements were pretty straightforward. I wanted a command line tool that would allow me to generate all of my store listing screenshots for each app that I’ve created and for every language each app supports. I want to be able to click a few buttons and after some indeterminate time have all the raw screenshot assets generated and organized for me. Seems easy enough.
After a few weeks of chipping away at the project in my spare time, I finally ended up with a system that I am pretty happy with. Here is a video demo of the final project.
What you’re seeing in this video is a desktop recording of my PC while it runs the screenshot automation. The script starts by asking the user a series of questions to determine which screenshot assets it should generate.
IT ASKS:
- Which app to run screenshot automation for
- Which language(s) to use – to keep the demo short, I selected a single language and chose non-English to showcase a run where it changes the emulator language
- Which flavor(s) to run
- Which scenario(s) it should run

Once the script has all of the information, it begins the automation. The script automatically starts up an Android emulator via some ADB commands and then changes the language of the emulator to match what has been selected. This was the trickiest part of the whole project, and I’ll get into how that works in a bit.
After the emulator language has changed, it runs all of the screenshot scenarios I have configured. Behind the scenes, each screenshot scenario is an Espresso test with a custom JUnit TestWatcher that will capture a screenshot upon completing the test (more on this in a bit too).
Once all screenshot scenarios have run for all the selected flavors of this language, it will migrate the generated screenshots off the emulator and onto my PC, then move onto the next.
Each run is saved under a unique folder name which is based on the chosen parameters for the current run, with an auto-incremented number at the end to account for duplicates. These folders are all added inside a “screenshots” folder inside the automation script’s root directory:

Beneath each of those directories is a list of sub-directories – one sub-directory for each language that was run. This keeps them sorted and organized so they are easy for me to export and move over to Photoshop or GIMP for post processing:

Inside each of the language folders is the set of resulting raw screenshot images that were generated from the automation script:

Now whenever I make some significant changes to my apps and need to update the screenshots or whenever I produce new apps in the future, I can quickly and effortlessly generate all of the raw store listing screenshot assets I need.
Part 3: How it Works
Now for the fun part – explaining how I built this Android Screenshot Automation project so that you can build yours too.
In the past with my Side Project Time Hack blog posts, I’ve fallen into the trap where I explain too much about the pieces of the project that don’t matter much. So for this post, I’m going hit the highlights of what I feel you need to know to replicate this project for your own use. If there’s not enough detail here and there’s enough interest in a follow-up post that has a public repository and full code walkthrough, I’m happy to produce it. Feel free and contact me or leave a comment below to let me know. With that said, let’s get into it.
At a high level, this is a Python script that opens up a couple JSON configuration files and prompts the user for some info based on those configuration files. With those questions answered and the input received, the script invokes a few ADB commands to start up and configure an Android emulator before calling a Gradle command to run the Espresso screenshot scenarios I’ve written.
Once that Gradle command is finished running through all of the chosen screenshot scenarios, it pulls the generated raw screenshots off the emulated device and onto my computer. This process repeats for each language and each flavor that has been chosen according to the user input from the beginning.
To explain all these steps, I’m going to split things up into 3 sections: the configuration, the Emulator and ADB commands, and finally how the screenshot scenarios themselves work.
Configuration
To configure the project, I do so via a couple of JSON files so that everything is organized and easy to maintain moving forward.
The first is a config file called “app_config.json“, which contains an array where each object in the array represents an app I want my screenshot automation to support.
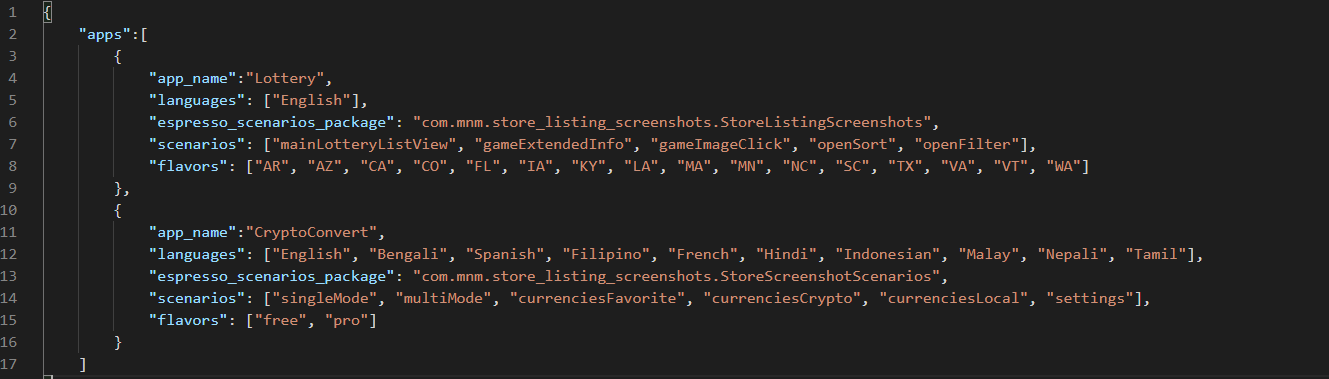
If you reference the demo video while looking at this file, you’ll see that the information here makes up the possible options for each question in the form wizard questionnaire that’s presented upon starting the script.
App_config.json:
The second configuration file is called “environment_config.json“. It’s similar to the app_config.json, except this controls all of the information about the current environment that the script is running on. This enables me to run the script from any machine I want, which is really useful when I’m switching back and forth from my laptop to my desktop.
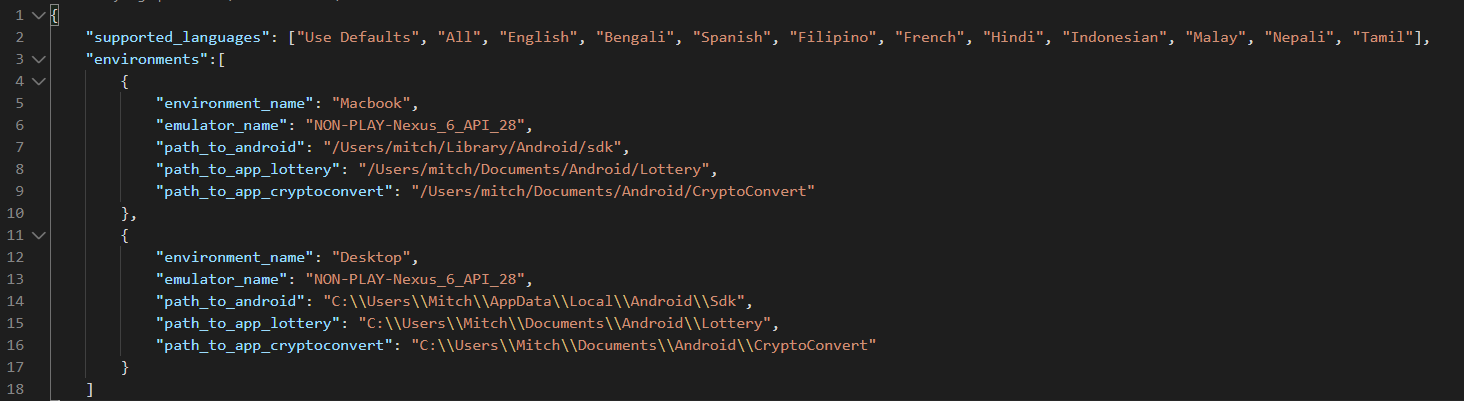
The environment_config file mostly contains file paths, but it also specifies an emulator name that will be launched by the script. This is the name of an emulator that you’ve already set up and configured on your machine via the AVD Manager. More on this in a bit, but I had to configure a special emulator on each of my machines just for this script. I used the same emulator name on both of my environments for consistency.
Environment_config.json:
The “path_to_android” is wherever your Android SDK is currently installed – which differs depending on your operating system. I used the default install location for both macOS and Windows 10 so if you’re running either of those, then your install location will probably be similar to mine.
The “path_to_app_x” are the root paths to my Android Studio projects for each respective app. This is needed so I can call the Gradle Wrapper to run the Espresso screenshot test case scenarios.
One more thing to mention – this file also holds an array of all the language options I want the script to support. I didn’t really want to hardcode this in a Python file, so I figured the environment_config.json file was as good a place as any. When the ‘Use Defaults’ option is selected for the language choice, the script will use the language array for the current app in the app_config.json.
Emulator and ADB Commands
The Emulator commands and ADB (Android Debug Bridge) are the real meat and potatoes of this project. They are responsible for orchestrating anything involving the emulator – starting and configuring it, changing the locale, pulling the generated screenshots off the device, and closing the emulator.
The general format for running an ADB command is nothing unusual:
adb {command} {parameters}
You can read more here, but the main thing you’ll need is the full path to your Android SDK install directory (I’ve defined this in environment_config.json as ‘path_to_android’). I only specify the path to the SDK in my configuration because the full path’s needed to invoke the both the Emulator and the ADB commands can be built from that like so:
The ADB can be found here:
/{path to Android Sdk}/platform-tools/adb
And the Emulator tools can be found here:
/{path to Android Sdk}/emulator/emulator
If you used the default settings when you first installed Android Studio, then both of these tools should already be installed. If you didn’t or they are otherwise missing from your machine, then they are easy to download separately.
With all that said, here are the commands that my Android Screenshot Automation Script is calling. To make them easier to read, I’m going to truncate the paths and just use “adb” and “emulator”, but know that behind the scenes, the script is using the fully qualified path for each of these as outlined above.
So if I write a command as:
adb {command} {parameters}
Then know that the screenshot automation script is actually calling it like:
/Users/{your_username}/Library/Android/sdk/platform-tools/adb {command} {parameters}
There are a variety of ways to run these commands with Python, but I ended up using subprocess.Popen.
COMMANDS YOU’LL NEED:
- Starting an emulator from command line:
emulator -avd {emulator_name} -wipe-data
I have included the ‘wipe-data’ flag here because I wanted to make sure that each run would be a clean slate. It takes a bit longer to boot this way, but that’s worth it to me because I don’t want the result of any screenshot scenarios to persist across each language when I run the screenshot scenarios.
Also {emulator_name} is the name of an emulator that you’ve already created on your machine through the Android Virtual Device Manager – in my case this emulator name is fed into the script from the environment_config.json file.
2. Checking for the emulator boot to complete:
adb shell getprop sys.boot_completed
After launching the emulator, it takes some time to boot up. I needed a way for my Python script to wait for the emulator to be ready before proceeding to run any screenshot scenarios, so I implemented a function in my script that runs the above command on a loop until the response indicates that the emulator has started and is ready.
I’ve implemented a timeout of 30 seconds and my script will ping the emulator’s status with this command every 0.25 seconds. If the emulator fails to start for whatever reason before the timeout is reached, my script will just skip the current language and move onto the next in the automation process.
3. Setting the language programmatically
This is where things get a bit tricky. I had a hard time trying to figure out how to make my apps display in a language of my choosing when running the screenshot scenarios. I found a few articles discussing how you can change the locale programmatically from within your Android Studio project, but I didn’t have much luck with any of those solutions.
I ended up accomplishing this by changing the locale on the emulator itself through ADB commands. This way any app I run on it will display in that locale. Going down this path wasn’t without it’s issues however, because the ADB commands have changed over the years and a lot of posts I found demonstrating how to do this were dated at 5+ years and no longer seemed to work. Also Android has changed a lot over the years, so it’s possible that the solution I have only works for the newer APIs and you might need something different if you require screenshots taken on older devices.
After a lot of trial and error, this is what I finally did that worked. The system language and country codes that make up the device locale are properties on the device, so you can call the ADB shell and invoke the ‘setprop‘ command to change them.
However before you can change any system properties, you have to root the emulator. While this isn’t very apparent in any documentation I’ve found, the reason is because those system properties are stored in a read-only file that’s used by Android’s property_service. So in order to change those properties (and thus, the property file), you need root level access.
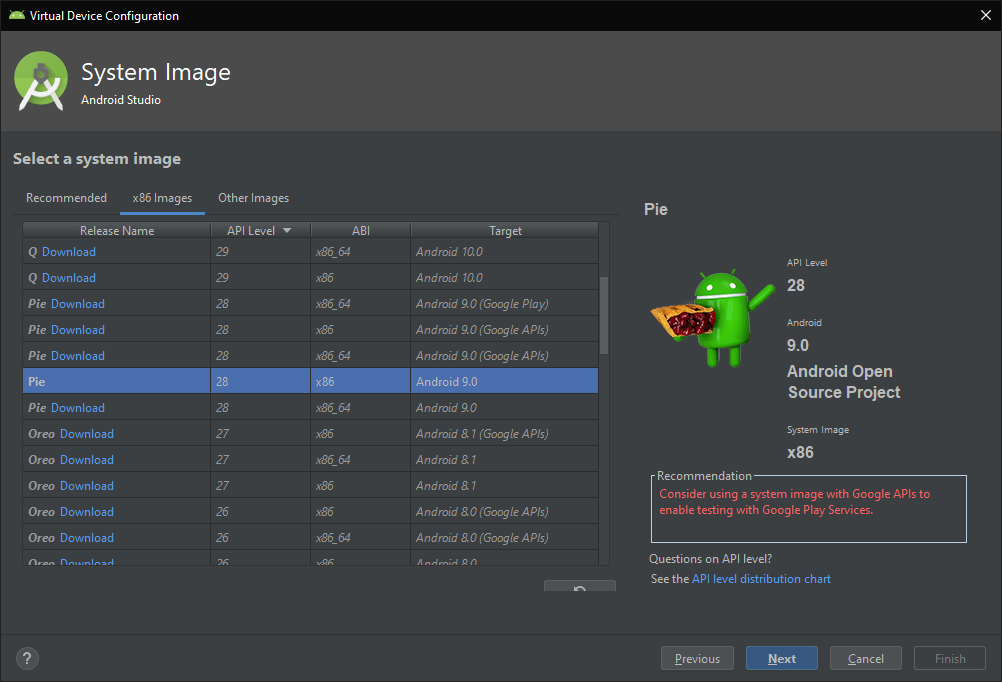
Earlier I mentioned that I had to create a special Android Virtual Device (AVD) just for my screenshot automation project to run. The reason is because you can’t root an emulator that’s running a “Google Play” system image, else you’ll get the error message “adbd cannot run as root in production builds” when you attempt to root the device using the ADB.
So instead of the usual system image you’d select in the “Recommended tab” when creating a new emulator, you can use the open source system image. In fact, you can ignore any system images in the “Recommended” tab, or anything that has the text “(Google Play)” next to the Android version number. Switch to the “x86 Images” tab or the “Other Images” tab to find a system image that works for you.
Able to Root(Open Source System Image) |
Not Able to Root(‘Google Play’ System Image) |
 |
 |
The two screenshots above show two different versions of an API 28 (Pie) system image. The one on the left is rootable through an ADB command because it is the Open Sourced version (no Google Play) whereas the one on the right is the standard Google Play version that you’d see in the recommended tab (not rootable).
A few things to look for are in the “Target” column, the one we want doesn’t have “(Google Play)” written next to the version number. Additionally, you can see there is a message on the Google Play system image that says “We recommend these Google Play images because this device is compatible with Google Play”, so ignore any system images with this message.
There’s a small caveat to using the open source system image like I am. The open source system images do not support Google APIs (which includes services like Firebase), so keep this in mind if your app depends on them. I would’ve encountered this problem because one of my projects relies on Firebase, but because I’ve set up MockWebServer and can load mocked data into my app for the screenshot test case scenarios, the app appears to be working normally when the screenshots are taken.
That’s good enough for me because it’s still a legitimate screenshot instead of an asset drawn up in Photoshop. This also gives me slightly more control on how the screenshots look when I can control the data that’s displayed in the UI.
Depending on your situation, using mocked data with MockWebServer might be an option available to you too (if you aren’t already). Writing about MockWebserver would warrant an entirely separate post, but when I implemented it into my projects, I found this, this, and this article really helpful.
I don’t think you are pigeonholed to just the open source versions because I believe you can also use the system images that say “(Google APIs)” instead of “(Google Play)” after the version number in the target column. The open source version was the first I tried that worked so I’ve stuck with that, but the “(Google APIs)” system images are probably worth a shot.
3a. Root the Emulator:
adb root
With a non Google Play system image chosen and a proper emulator created and running, we can finally root it. The adb root command is pretty straightforward. This gives us the permissions that enable us to change the locale information in the next step.
Note that after executing this command your device will automatically restart itself so you will need to wait for the emulator to become ready here too. Also because I am using the ‘wipe-data’ flag to start each emulator fresh between automation runs, my script needs to root the emulator on every run.
3b. Changing the language:
adb shell setprop persist.sys.language en; setprop persist.sys.country US; setprop ctl.restart zygote
What we are doing here is three steps bundled into one. We are calling the adb shell and setting the “language” and “country” system properties to “en” for English, and “US” for the country, then refreshing the device. Here’s an example that would change the device to French instead:
adb shell setprop persist.sys.language fr; setprop persist.sys.country FR; setprop ctl.restart zygote
Here, we’ve used “fr” as the language code and “FR” as the country code. If you’ve already translated your app’s assets, then you likely already know the language and country codes that your own screenshot automation project needs to support, but if you are just getting started with in-app translations, then you can read more about how Android handles localization here.
If you’re looking for some resources that provide all the different supported locales and languages, here’s a GitHub repo that has a few hundred examples (though it appears slightly dated) and also this Stackoverflow post that really helped me. Depending on how specific your localization is you might need to do a bit of trial and error for each language you want your screenshot automation to support. Note also that the language and country code pairings may vary slightly across Android API levels.
To make these code pairings easily accessible to my Python script, I store them in a dictionary so I can pass it a language name and receive the proper language and country codes to use for the setprop commands above.

4. BONUS: Disabling emulator animations:
adb shell settings put global window_animation_scale 0
adb shell settings put global transition_animation_scale 0
adb shell settings put global animator_duration_scale 0
These aren’t necessary, but I think are worth including. These three commands will disable the animations on your emulator which has a couple performance benefits.
First, disabling animations will make your entire screenshot automation run much faster. In my case, disabling animations shaved several minutes off my overall run time.
Disabling device animations also makes your resulting screenshots themselves much more stable. In my implementation of this project, a screenshot is taken automatically at the end of each Espresso test case scenario. With the device animations still enabled, sometimes the resulting screenshot is of the app while it’s mid-animation because the animations add a small delay while the transition runs.
This can sometimes result in a reject screenshot that will need to be retaken. Removing the animations helps prevent this from happening:
Reject Mid-Animation Screenshot |
Expected Screenshot |
|
 |
 |
5. Running the screenshots:
{path_to_Android_project}/gradlew -p {path_to_Android_project}/app connected{flavor}DebugAndroidTest -Pandroid.testInstrumentationRunnerArguments.class='{screenshot_scenarios_package_and_class_name}'
Because the screenshot scenarios are simply Espresso UI test cases in a Java class (more details in the following section), we can use Gradle to run them on our configured emulator via the command line. This is why I’ve included the path to the Android Studio projects for each app in the environment_config.json file.
I based this command from a default Gradle task that you can find in the Android Studio UI. These are found by opening the Gradle tasks panel on the right hand side of Android Studio and navigating down the tree like so:
{Project Name} -> app -> Tasks -> verification
There are over a dozen tasks here relating to testing (important ones are highlighted).
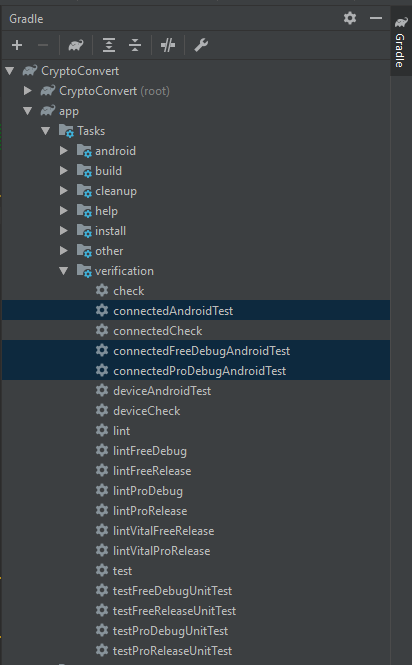
The highlighted Gradle tasks will run the Espresso UI tests for your app. There is a generic one called “connectedAndroidTest” which will run the UI tests for all flavors. There’s also a task for each specific flavor of your app. In my case I have two flavors for CryptoConvert – ‘Free’ and ‘Pro’.
When I choose to run my screenshot automation for all flavors, the script will use the generic “connectedAndroidTest” task. When I only want to run the scenarios for a specific flavor, then the script will use the task related to the flavor I’ve chosen – which gives my script some flexibility.
Without any changes to the default Gradle tasks, every Espresso UI test in your project will be executed alongside the screenshot scenario Espresso tests. This is less than ideal because it adds additional run time for the script, so to restrict the command to only execute the Screenshot scenarios, I’ve added the ‘testInstrumentationRunnerArguments.class’ flag.
To use this, you need to pass in the package name plus class name for where the screenshot test scenarios are as an argument. In my case, I keep my screenshot scenarios in this package:
com.mnm.store_listing_screenshots
And the class name is:
StoreScreenshotScenarios
So the argument I add is:
com.mnm.store_listing_screenshots.StoreScreenshotScenarios
Furthermore, to specify just one specific test case scenario, we can append the name of it to the end of that string with a ‘#’ as a separator. Such as:
com.mnm.store_listing_screenshots.StoreScreenshotScenarios#testName
This is why in the app_config.json I include an array of screenshot scenarios. The strings in that array directly correspond to the test names in my screenshot scenarios class.
This adds a lot of flexibility to the project because it means I can be as specific as I’d like when generating my screenshots. I can choose to generate screenshots for all scenarios, or if I just want to generate the new screenshots for one specific scenario, then I can do so without having to wait for the full automation to run.
6. Pulling screenshots off the device:
adb pull {source directory} {destination directory}
The adb pull command accepts a source directory and a destination directory as parameters. The destination directory is pretty straightforward because it’s the path to wherever you want your files to go. However the source directory may vary depending on your emulator’s configuration.
For me on an emulator configured as a Nexus 6 API 28, the source directory is:
storage/emulated/0/Pictures/screenshots
7. Killing the emulator:
adb emu kill {your_emulator_name}
After the screenshot scenarios run and the script has transferred the screenshots files from the emulator to my machine, it will kill the active emulator instance before moving onto the next language of screenshots.
A lot of these commands only work if there is one active emulator at a time, so my script closes the active emulator before starting fresh with a wiped emulator on the next language.
How to Set Up and Capture Screenshot Scenarios
As I mentioned above, the act of taking the screenshots and running through each screenshot scenario is mostly handled by Android’s Espresso library.
If you’re not an Android developer then you may not be familiar with Espresso, but long story short it’s a UI testing framework for Android apps. You can use it to set up tests that will programmatically click on and interact with different UI elements in your app like buttons and text boxes just like a regular user would and you can run these tests to help verify that your app is still working properly over time. We can use Espresso to programmatically click through UI elements to get the app in a state where it’s ready to have a screenshot taken.
While doing some research during my initial phases of this project, I stumbled across this article by Sergei Munovarov titled “Capturing Screenshots on Android with Espresso and Junit” (written December 10th, 2017). He was dealing with similar app screenshot upkeep problems and also had the idea to automate it. Unfortunately I wasn’t able to use his full tutorial because his solution achieved the device language change through a custom JUnit TestRule, but I couldn’t replicate his work and had to find an alternative way to change the device language. The second half of his tutorial where he discusses the screenshot mechanism worked without any trouble for me, so I was able to use some of his ideas as a base for my project.
His idea is to implement a custom TestWatcher class called ‘ScreenshotWatcher’. The TestWatcher class is built into Junit and gives us a way to know exactly when each of our Espresso test case scenarios has passed or failed. Whenever each test completes that uses this custom ScreenshotWatcher, it will call either the ‘succeeded’ or ‘failed’ callback. In either case, we’ll know that the screenshot scenario is ready to be captured, so we can use the static Screenshot.capture method to take a screenshot which gets stored on the device.
If you’re still using the Support libraries and haven’t migrated to AndroidX yet, here’s a link to the documentation for the Support library version.
Sergei’s article explaining all this is really easy to follow, so I’m going to give credit where it’s due and direct you to his post for more information about how you can implement this.
Conclusion – Final Thoughts
That’s all there is to it!
Although this screenshot automation project took a bit longer for me to develop than one of my usual Side Project Time Hack projects, the payoff was well worth the time investment.
What would previously take weeks of unrelenting, tedious, and outright boring work has now been completely automated. The full automation script takes less than 20 minutes to run for either of my main projects – and during that time I can be working on other things concurrently.
Now that it takes me a fraction of the time and effort to generate all of my raw screenshot assets, it will be much easier to keep my store listing screenshots up to date as my apps change. This will hopefully have the indirect benefit of increasing the amount of new downloads and user retention that I see for my apps moving forward because my screenshots will be a much more accurate picture of what a user will get when they download any of my apps.
Future Iterations of this project – v2.0 and beyond
While this project has automated a massive chunk of work for me, I think there are some ways to expand it.
The worst part about updating the store listing screenshots for my apps was undoubtedly generating the raw screenshot assets, but as of right now the process moving forward will still require me to do all the post processing by hand.
In other words, I still need to take these raw screenshot assets, import them into my GIMP templates, do a little bit of editing, and export them out as the finalized store listing screenshots like this:
RAW SCREENSHOT ASSET |
FINALIZED STORE LISTING SCREENSHOT |
|
 |
 |
I’ve come to learn that GIMP is controllable with Python, so I think a potential v2.0 of this project would be to automate all of the post processing steps too.
Once that’s accomplished, the only manual steps I would need to do in order to update all of my store listing screenshots would be to upload them to the app store, but even that part is possible to automate through the Google Play Developer Publishing API.
For now that will have to be a project for another day.
Thank you very much for reading! I hope this post was helpful and inspires you to work on your own automation projects.
If you have any questions, comments, or suggestions on this post, leave a comment below or contact me.
You might also be interested in some of my other blog posts. I don’t write as often as I’d like, but you can also enter your email below to be notified by email whenever I publish a new post.
![]()
One comment
You completed some nice points there. I did a search on the matter and found the majority of folks will go along with with your blog.